 Save
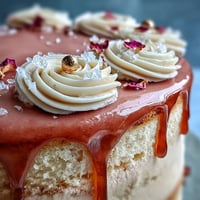
Save My cousin's graduation party was supposed to be simple, but then her mom asked if I could make something special. I'd never attempted a decorated cake before, and there I was at midnight the night before, watching YouTube videos and wondering if edible gold foil was worth the hype. Turns out, when that cake caught the light at the celebration, watching my cousin's face light up made every nervous moment worthwhile. This recipe became my go-to for marking life's big moments, the kind where you want dessert to feel as important as the person you're celebrating.
I'll never forget sliding that first frosted layer onto the cake board while my friend hovered nearby, offering commentary I definitely didn't ask for. When the gold foil caught the light and she gasped, I realized this wasn't just about technique anymore—it was about creating a moment. That's when I understood why people fuss over celebration cakes; they're edible memories, proof that someone mattered enough to spend time making something beautiful.
Ingredients
- All-purpose flour: Use the 310g weight measurement for accuracy; scooping directly can pack flour and throw off your ratios, something I learned the embarrassing way.
- Unsalted butter: Softened to room temperature means it creams properly without the grainy texture that cold butter creates.
- Granulated and powdered sugar: These serve different purposes—granulated aerates the cake while powdered sugar creates the smooth frosting body, so don't swap them around.
- Eggs at room temperature: They incorporate evenly into the batter, creating a tender crumb instead of a dense one.
- Vanilla extract: The real stuff makes a noticeable difference in a cake this straightforward; don't settle for imitation.
- Whole milk: Room temperature milk prevents shocking the batter and helps distribute evenly throughout.
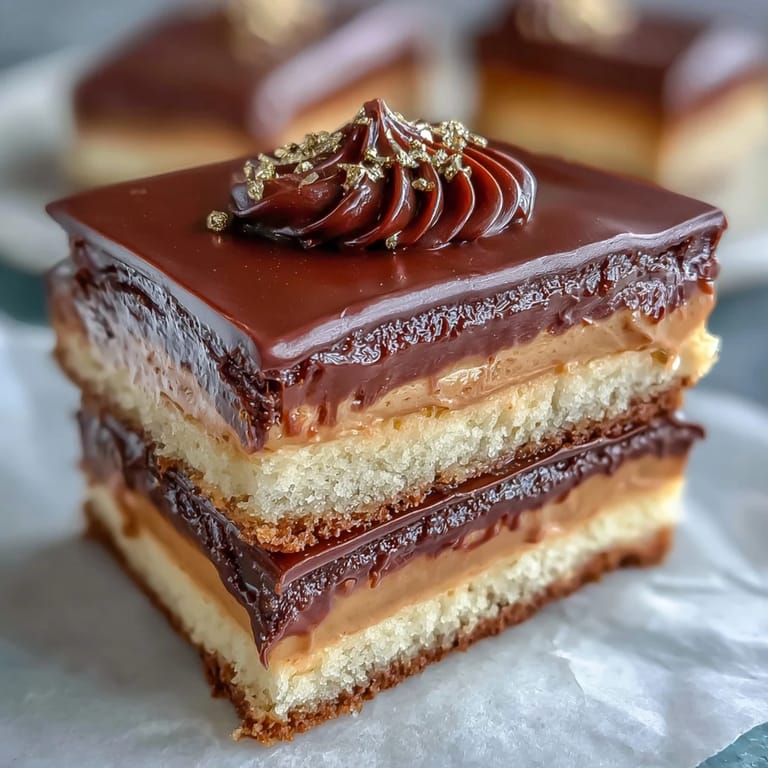
- Edible gold foil: Delicate and temperamental, but absolutely transformative—handle it with tweezers or completely dry hands, or it'll stick to your skin instead of the cake.
- Diploma topper: Whether store-bought or homemade, this becomes your cake's focal point, so choose something that matches the celebration's vibe.
Tired of Takeout? 🥡
Get 10 meals you can make faster than delivery arrives. Seriously.
One email. No spam. Unsubscribe anytime.
Instructions
- Prepare your pans and preheat:
- Set your oven to 350°F and line your pans with parchment paper—this prevents the frustrating moment when a beautiful cake refuses to release. Greasing underneath the paper ensures nothing sticks.
- Combine the dry ingredients:
- Whisking flour, baking powder, and salt together prevents lumps and distributes the leavening evenly. This quiet step matters more than it seems.
- Cream butter and sugar:
- Beat them for 3 to 4 minutes until the mixture turns pale and fluffy—you're incorporating air that will help the cake rise. Listen for the mixer to sound slightly softer; that's your signal.
- Add eggs carefully:
- Adding one egg at a time and beating well after each keeps the batter emulsified and smooth. Rush this step and you'll end up with a greasy-looking mixture.
- Alternate wet and dry ingredients:
- Start and end with flour, adding in three additions of flour and two of milk. This prevents overmixing, which develops gluten and creates a tough crumb.
- Divide and bake:
- Pour batter evenly between pans and smooth the tops so both layers bake at the same rate. Bake 28 to 32 minutes until a toothpick comes out clean—don't rely solely on time.
- Cool properly:
- Ten minutes in the pan lets the structure set, then turn onto racks to cool completely. Rushing this leads to cakes that crumble during frosting.
- Make the buttercream:
- Beat butter until pale and creamy, then gradually add powdered sugar to avoid a powdery mess. The milk or cream adds smoothness and spreadability—use it sparingly until you get the consistency right.
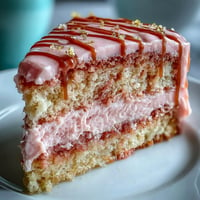
- Level and layer:
- If your cakes domed on top, trim them flat for a stable stack. A thick frosting layer between them cushions each bite.
- Apply the crumb coat:
- This thin first layer traps crumbs so your final frosting looks polished. Chilling for 30 minutes sets it and makes the final coat go on smoothly.
- Final frosting:
- Use an offset spatula and take your time—smooth is achievable if you dip your spatula in warm water between swipes. Perfection isn't necessary; character is.
- Add the gold foil:
- Use tweezers and work from the bottom up, pressing gently so it adheres without tearing. The foil catches light unpredictably, so experiment with placement.
- Top and chill:
- Place your diploma topper where it catches the eye, add sprinkles if you'd like, then chill briefly. Serve at room temperature for the best flavor.
 Save
Save Standing in my kitchen at three in the morning, applying that final gold leaf, I realized celebration cakes teach you something quiet about showing up for people. This one carries vanilla and buttercream and enough shimmer to feel genuinely special, which is exactly what graduation moments deserve.
Flavor Variations That Still Shine
The vanilla base is a blank canvas if you want to personalize it. Adding almond extract (1 tsp to the batter) creates a subtle sophistication that deepens without overwhelming. You can tint the buttercream with gel food coloring to match school colors, which I've done three times now—gel food coloring stays bright without adding unwanted liquid like liquid dyes do. Chocolate lovers can replace half the vanilla cake with chocolate, though the decoration becomes more dramatic and less delicate.
Storage and Serving Tips
This cake stays fresh at room temperature for up to two days covered loosely, though the buttercream softens slightly. Refrigerate if your kitchen is warm or if you made it more than a day ahead; it firms up and slices cleanly when cold, then softens back to its tender crumb as it comes to temperature. The edible gold foil doesn't affect storage—it's purely decorative and adds nothing but visual magic.
Making It Feel Completely Yours
The diploma topper is where personality lives in this cake. Store-bought versions are fine, but I've started making mine from fondant with edible markers, which lets me add the graduate's name or their school colors. The edible gold foil can be applied sparingly for elegance or generously for sparkle—I've done both, and both felt right for different celebrations. Don't be afraid to experiment with the sprinkles or confetti either; they're the final punctuation on a dessert that's already saying something important.
- If you're making the diploma topper from fondant, let it dry completely (at least 24 hours) before placing it on the frosting so it doesn't soften.
- Keep edible gold foil in a cool, dry place and handle it only with tweezers or completely dry hands to preserve its delicate sheen.
- This cake serves 12 graciously, but leftover slices freeze beautifully wrapped individually and thaw at room temperature in about an hour.
 Save
Save This cake became my answer to celebrating the people I love most, the ones crossing thresholds into new chapters. Make it with attention but not anxiety, and it will absolutely deliver.
Kitchen Guide
- → What type of flour is best for this cake?
All-purpose flour is recommended to achieve a balanced texture that is tender yet sturdy enough for layering.
- → How do I prevent the cake from drying out?
Ensure not to overbake by checking with a toothpick; also, allowing the cake to cool properly before frosting helps retain moisture.
- → Can I customize the gold foil decoration?
Yes, handle the edible gold foil carefully using tweezers to apply delicate patterns or accents as desired.
- → What is the best way to achieve smooth buttercream frosting?
Beat the butter until creamy before gradually adding sifted powdered sugar, vanilla, and milk to reach a spreadable consistency.
- → Are there tips for making the diploma topper?
The topper can be crafted from fondant or paper; using edible markers on fondant ensures a fully edible decoration.