 Save
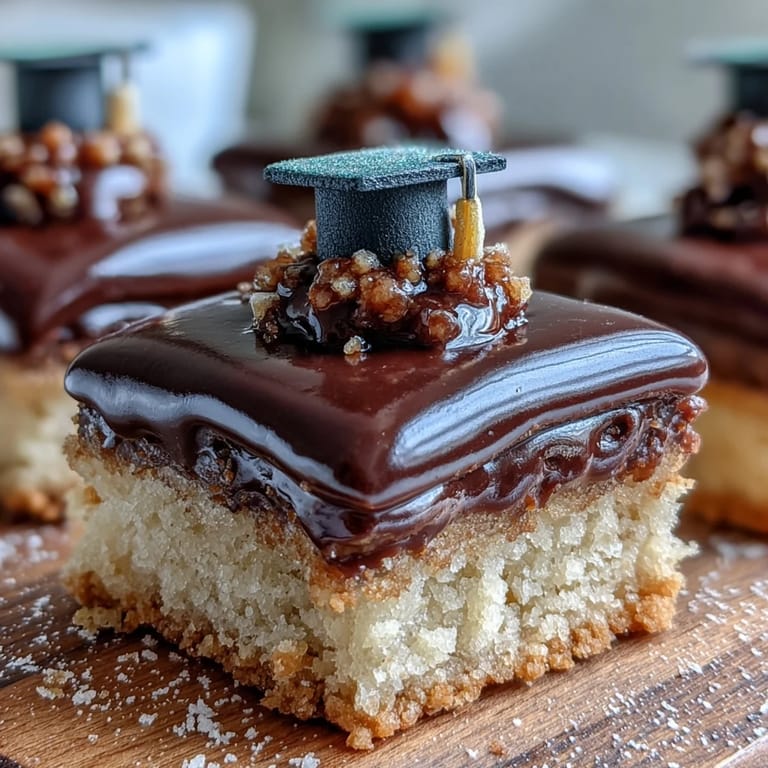
Save My niece's graduation was happening on a Saturday, and I'd promised her something special for the celebration brunch. Standing in my kitchen at dawn, I realized I wanted to create something that felt both grown-up and playful—a way to honor the milestone without being too serious about it. Sugar cookies with fondant mortarboards came to mind, and I loved that they were simple enough to pull off, yet impressive enough to make her feel genuinely celebrated.
What I didn't expect was how therapeutic the whole process became. As I carefully shaped those tiny fondant mortarboards, my hands just went into this meditative rhythm, and suddenly two hours had passed without me noticing. By the time everything was decorated and sitting on the cooling rack, the kitchen smelled like vanilla and butter, and I felt this quiet pride knowing I'd made something personal for someone I love.
Ingredients
- All-purpose flour: The backbone of these cookies—make sure it's measured correctly by spooning and leveling, not scooping straight from the bag, or your dough might end up dense.
- Unsalted butter: Room temperature is non-negotiable here because cold butter won't cream properly and you'll miss that light, fluffy texture that makes these cookies so good.
- Granulated sugar: This creates cookies that are slightly crispy on the edges while staying tender inside, which is exactly the texture you want.
- Egg and vanilla: These add richness and flavor that takes the cookies from basic to genuinely craveable.
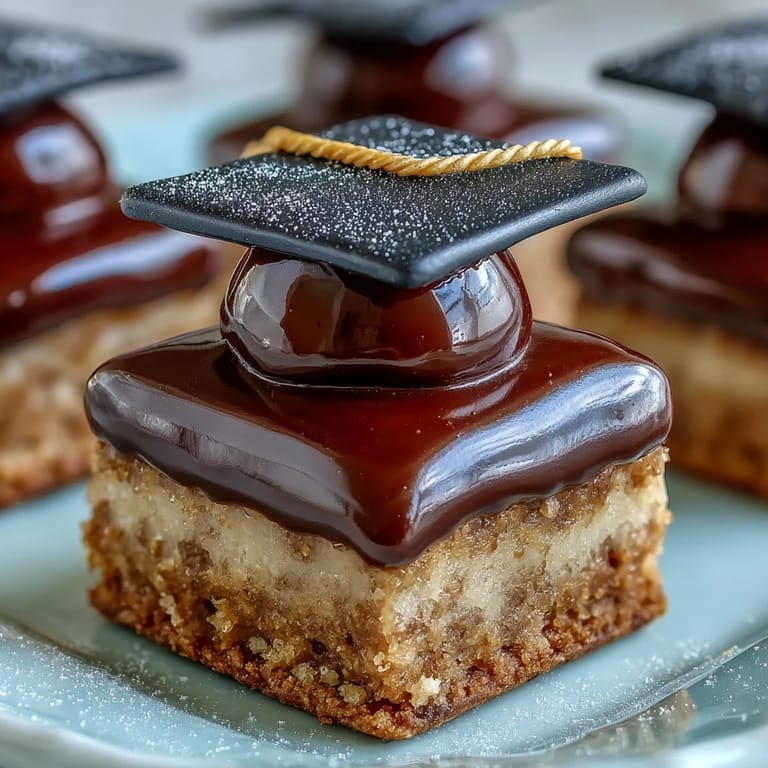
- Black fondant: You can find this at any cake supply store or online—it's worth buying rather than trying to color white fondant black, which takes forever and stains your hands.
- Yellow fondant: For the tassel detail that really makes each mortarboard feel special and intentional.
- Powdered sugar and milk: This simple icing acts as the glue for all your fondant pieces and also adds a subtle sweetness to the finished cookie.
Tired of Takeout? 🥡
Get 10 meals you can make faster than delivery arrives. Seriously.
One email. No spam. Unsubscribe anytime.
Instructions
- Preheat and prepare:
- Turn your oven to 350°F and line your baking sheets with parchment paper—this step prevents sticking and makes cleanup almost painless.
- Combine dry ingredients:
- Whisk your flour, baking powder, and salt together in a bowl to distribute the leavening evenly and avoid any pockets of baking powder in your cookies.
- Cream butter and sugar:
- Beat them together for a full 2-3 minutes until the mixture turns pale and fluffy, which aerates the dough and makes the cookies light instead of dense. You'll notice the color change and the mixture becoming almost cloud-like.
- Add egg and vanilla:
- Beat these in until completely combined, scraping down the bowl as you go to ensure everything is evenly mixed.
- Bring it together:
- Add your dry ingredients to the wet mixture, stirring just until the flour disappears—overmixing develops gluten and toughens the cookies, so resist the urge to overwork the dough.
- Roll and cut:
- Roll the dough to 1/4-inch thickness on a lightly floured surface and cut into your desired shapes, aiming for consistent thickness so everything bakes evenly. A dusting of flour on your rolling pin prevents sticking without adding extra flour to the dough.
- Bake with patience:
- Bake for 10-12 minutes until the edges are just golden—they'll continue cooking on the hot pan after you pull them out, so don't overbake or they'll be hard. Let them cool completely on a wire rack before decorating.
- Prepare fondant pieces:
- While cookies cool, roll your black fondant thin and cut small squares for the mortarboard tops, then roll tiny cylinders for the bases. Dust everything with cornstarch as you work to prevent sticking.
- Make fondant tassels:
- Roll yellow fondant into thin ropes and cut into 1-inch pieces, shaping them however you like—they don't need to be perfect because imperfection adds charm.
- Mix your icing:
- Combine powdered sugar, milk, and vanilla until you reach a consistency that's smooth but still holds its shape when piped or dolloped. It should be thick enough to glue fondant pieces but thin enough to spread.
- Decorate with intention:
- Use the icing to attach your fondant pieces to each cooled cookie, layering the square on top and the cylinder underneath, then finishing with the tassel. This is the fun part—take your time and enjoy the details.
- Let everything set:
- Give the decorated cookies 20-30 minutes for the icing to firm up before you package or serve them, which ensures the fondant stays in place and the overall presentation stays pristine.
 Save
Save When I delivered these cookies to my niece's party and saw her face light up—not just at the cookies themselves, but at the thought someone had spent time creating something so specifically for her—I realized that's what home cooking really is. It's not about perfection; it's about showing up with something made by your own hands.
Customizing for Your Graduate
The beauty of this recipe is how easily you can make it personal. You can color the fondant mortarboards in school colors, adjust the cookie shapes to be squares or rectangles if you prefer, and even add a name or year in icing on the cookie itself. I've seen people use different fondant colors for the tassels to represent different school departments or create ombre effects by blending colors, and honestly, the more personalized you make it, the more meaningful it becomes.
Storage and Make-Ahead Tips
These cookies are actually more forgiving than you'd think when it comes to timing. You can bake the cookies up to 3 days ahead and store them in an airtight container, then decorate them the morning of your event when you have fewer things to juggle. The fondant pieces don't dry out as long as they're not exposed to air, and honestly, cookies that sit overnight taste even better because the flavors have time to settle and develop.
A Word on Fondant Work
If you've never worked with fondant before, this recipe is the perfect gateway project because the pieces are small and simple—there's no pressure to create something elaborate. The key is keeping cornstarch nearby to prevent sticking, warming your hands if the fondant gets too firm, and remembering that lumps and imperfections actually add character rather than detract from it. Every mortarboard doesn't need to look magazine-perfect; they just need to look made with care, which they will be.
- Keep your work surface dusted with cornstarch but not so much that it gets into the fondant and makes it grainy.
- If your fondant cracks when you roll it, just gently press the pieces together and continue—it will hold just fine once you ice it onto the cookie.
- Have a backup batch of fondant on hand in case you make mistakes because it's better to be prepared than stressed.
 Save
Save These cookies have a way of making celebrations feel extra special without demanding professional baking skills or hours of your time. Whether you're sending someone off to college or celebrating their high school finish line, there's something deeply personal about giving homemade food as a way of saying you're proud of them.
Kitchen Guide
- → How do I keep the fondant from sticking?
Dust your work surface and rolling pin lightly with cornstarch to prevent fondant from sticking while rolling and cutting.
- → Can I prepare the cookies in advance?
Yes, the cookies can be baked and decorated a day ahead, then stored in an airtight container to retain freshness.
- → What is the best way to shape the mortarboard hats?
Roll fondant to a thin 1/8-inch thickness, cut small squares for the tops, and roll small cylinders for the bases, attaching with icing.
- → Are there alternatives for decorating if fondant isn’t available?
You can use royal icing or candy melts to create shapes resembling mortarboard hats as an alternative decoration.
- → How do I ensure the icing holds the fondant pieces securely?
Mix the icing until smooth and use a small amount as glue, allowing it to set for 20-30 minutes before handling.