 Save
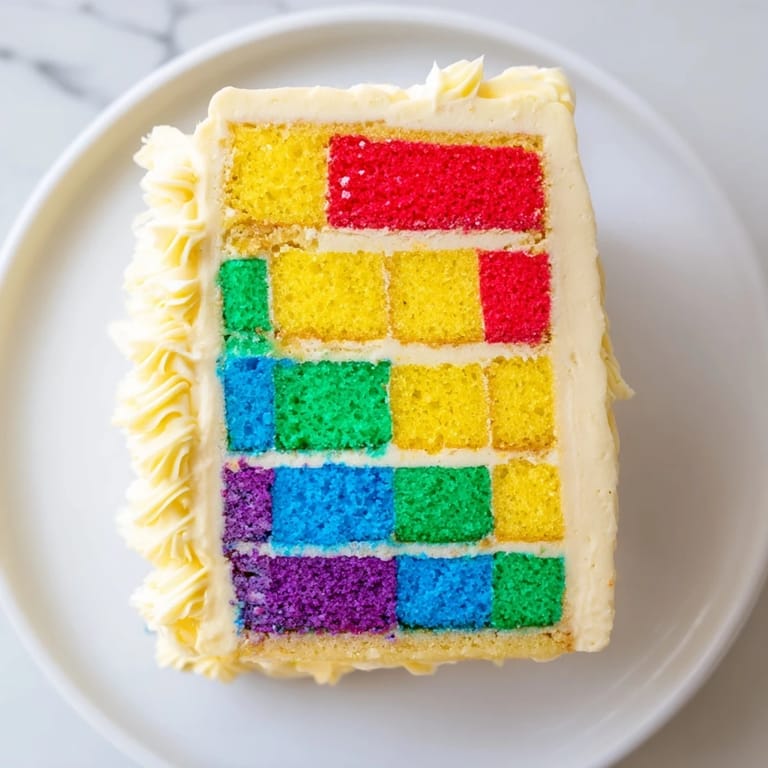
Save I discovered this cake on a rainy afternoon while flipping through my grandmother's quilting magazines. She'd spent decades arranging fabric scraps into beautiful patterns, and it struck me that a cake could tell the same story—colorful, intentional, and deeply comforting. The first time I made it, my kitchen looked like a paint studio, with five bowls of pastel batter waiting to become something magical. When I pulled those square layers from the oven and arranged them like a quilt, even I was amazed at what had emerged.
I'll never forget baking this for my daughter's school fundraiser. She stood on a stool beside me, carefully choosing which color went where, turning our kitchen into a collaborative art studio. When we unveiled it at the bake sale, the other parents gathered around like we'd just displayed a museum piece. It raised more money than anything else that day, but honestly, watching her beam with pride was the real win.
Ingredients
- All-purpose flour (350 g): The foundation of your tender crumb. I learned early on that sifting it together with the baking powder prevents lumpy pockets that can ruin the smooth surface you're aiming for.
- Granulated sugar (300 g): This sweetens but also lightens the cake when creamed properly with butter—don't skip the creaming step, as it's where the magic begins.
- Baking powder (2 ½ tsp): The gentle leavening agent that gives this cake its pillowy lift without overwhelming the delicate colors.
- Unsalted butter (250 g), softened: Room temperature butter is non-negotiable here; it incorporates air and distributes flavor evenly through each hue.
- Large eggs (4): They bind everything together while adding richness. I always let mine come to room temperature for better incorporation.
- Whole milk (250 ml): This keeps the cake moist and tender, creating that perfect crumb that holds the patchwork shape beautifully.
- Vanilla extract (2 tsp): A simple ingredient that reminds you this is still, at its heart, a humble cake beneath the artistry.
- Food coloring gels (red, yellow, green, blue, purple): Gel colors are the secret—they won't dilute your batter like liquid colors do, keeping the texture perfect and colors vibrant.
- Unsalted butter for frosting (350 g), softened: This becomes the glue and finish that holds your patchwork vision together.
- Powdered sugar (500 g): Sifted into the frosting, it creates that smooth, spreadable luxury without graininess.
Tired of Takeout? 🥡
Get 10 meals you can make faster than delivery arrives. Seriously.
One email. No spam. Unsubscribe anytime.
Instructions
- Set the stage with proper preparation:
- Preheat your oven to 180°C and grease those five square pans like you're preparing a canvas. If you only have one or two pans, that's fine—you'll bake in batches, which honestly gives you time to really settle into the rhythm of baking. Line them with parchment so your colored cakes slide out effortlessly.
- Build the base with creaming:
- In a large bowl, beat your softened butter and sugar together until it looks like pale, fluffy clouds. This takes about three minutes with an electric mixer, and you'll know it's right when you lift the beaters and the mixture falls in ribbons. Beat in each egg one at a time, letting each one fully disappear before adding the next. Stir in your vanilla and take a moment to appreciate how far you've come.
- Combine the dry foundations:
- In another bowl, whisk together your flour, baking powder, and salt. This aerates the flour and distributes the leavening evenly—details matter in a cake this precise.
- Marry wet and dry with intention:
- Add the flour mixture and milk alternately to your butter mixture, starting and ending with flour. Do this gently, folding rather than stirring aggressively. You want everything just combined; overmixing develops gluten and makes the cake tough, and we're after tender here.
- Divide and paint with color:
- Pour your batter evenly into five bowls. This is where the magic happens—add your chosen food coloring gel to each bowl, just a drop or two at first, stirring until you achieve your desired hue. You can make them pastel or bold; it's your quilt. I prefer soft, watercolor shades that feel soothing on the plate.
- Bake with patience:
- Pour each colored batter into its prepared pan and spread evenly with a spatula. Bake for 20–25 minutes until a toothpick inserted in the center comes out clean or with just a few moist crumbs. Your kitchen will smell absolutely incredible—that vanilla and butter perfume is part of the whole experience.
- Cool with respect for timing:
- Let the cakes cool in their pans for 10 minutes. This sets the structure. Then turn them out onto cooling racks, which takes a gentle touch. Let them cool completely—this is important for clean cutting later. If you're impatient, stick them in the fridge to speed things up.
- Prepare the frosting foundation:
- While the cakes cool, beat your softened butter until it's light and creamy. Gradually add powdered sugar, a little at a time, beating well between additions to avoid a powdered sugar cloud in your kitchen. Add vanilla and salt, then milk one tablespoon at a time until you reach that perfect spreadable consistency—thick enough to hold structure but soft enough to work with.
- Cut with precision into squares:
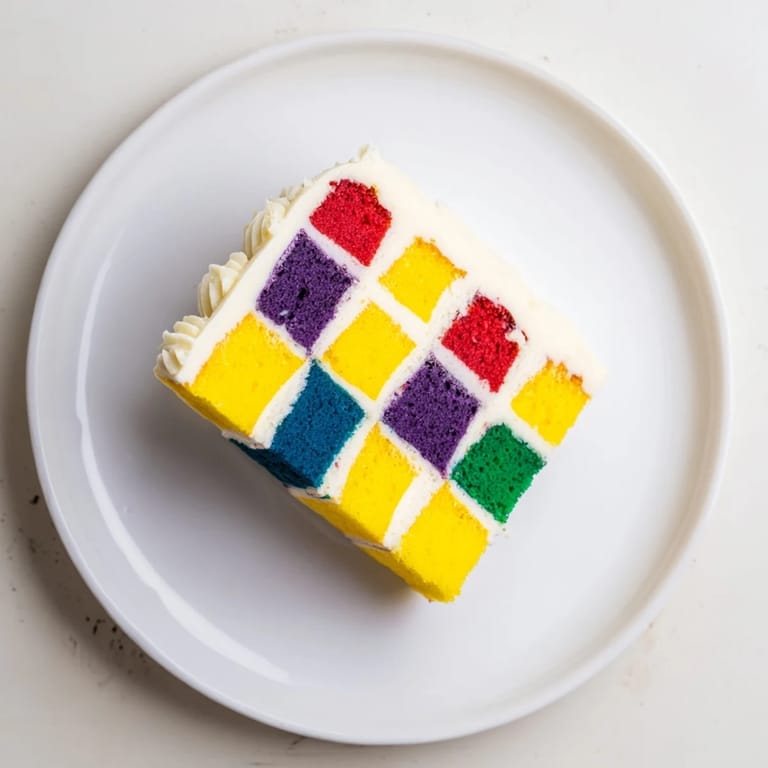
- Once cooled completely, trim the edges of each colored sponge for neat squares. Then slice each into uniform pieces, about 3 x 3 centimeters. A serrated knife and a steady hand here make all the difference. I like to use a ruler to mark my cuts first—it feels fussy, but the result is worth it.
- Arrange your edible quilt:
- On a large serving tray, begin your patchwork. Lay down your first square, add a thin layer of buttercream, then place another square in a complementary color. Continue building in a checkerboard or alternating pattern, layering as you go. The buttercream acts as your mortar, gluing the structure together. Build up several layers, maintaining your color pattern vertically as well as horizontally.
- Frost and finish:
- Once assembled, frost the top and sides with a thin, even layer of buttercream. Smooth it with an offset spatula for that polished look. If you're feeling artistic, pipe thin lines of frosting over the top to enhance the quilted grid effect—but only if it calls to you.
- Chill before the grand finale:
- Place the finished cake in the refrigerator for 30 minutes. This sets the frosting and makes slicing cleaner. When you cut into it, you'll reveal those beautiful colored layers within—a pleasant surprise for everyone eating it.
 Save
Save My favorite moment came when a neighbor brought her elderly mother over to see the cake. The mother, who had quilted for sixty years, sat quietly looking at it for a long time. Then she said it was the most beautiful thing she'd seen in months, not just because it was pretty, but because someone had taken the time to understand what quilting meant—patience, intention, and making something whole from colorful pieces. I wrapped up a slice for her, and I think that's when I understood this cake was never really about impressing people. It was about creating something that honors the small arts we love.
The Story Behind the Colors
Each color tells its own story. Red brings warmth and boldness, yellow whispers of sunshine and happiness, green grounds everything with calm, blue evokes tranquility, and purple ties it all together with a touch of magic. When you're choosing your colors, think about the feeling you want the cake to evoke. Soft pastels feel gentle and nostalgic; bold, saturated hues feel celebratory and modern. There's no right choice here, only the choice that feels right to you on that particular day. I've made this cake in autumn golds and oranges, in cool winter silvers and whites, in spring pastels, and in jewel tones for celebration. Each version felt entirely its own.
Making It Your Own
The beauty of this recipe is how infinitely customizable it is. Add a teaspoon of almond extract or lemon zest to the batter for subtle flavor shifts. Use cream cheese frosting instead of buttercream for tang. Create a pattern that's personal to you—stripes, blocks, or a random arrangement that feels playful. You could even tint the frosting different colors to echo your quilt. Some bakers I know have made this for baby showers with pastel pinks and blues, for pride celebrations in rainbow hues, for minimalist weddings in shades of white and cream. This recipe is a canvas, and you're the artist.
Storage and Serving Suggestions
This cake keeps beautifully for three days at room temperature in an airtight container, and up to five days in the refrigerator. Buttercream actually stabilizes over time, making this cake better a day or two after baking. Serve it with lightly whipped cream, fresh berries that echo your color scheme, or simply on its own as the centerpiece it deserves to be. It serves twelve generously, and it photographs like a dream—expect requests to bring it to every gathering for the rest of your life.
- Store in an airtight container to keep the cake moist and the colors vibrant
- Bring to room temperature for 30 minutes before serving for the best flavor and texture
- Fresh berries in coordinating colors make the most stunning accompaniment
 Save
Save This cake is a reminder that baking, at its best, is about more than technique—it's about creating moments that matter. Whether you're making it for a celebration, a quiet afternoon, or simply to practice the art of something beautiful, know that the effort you're putting in transforms a kitchen into something sacred. Enjoy every step of this colorful journey.
Kitchen Guide
- → How do I achieve vibrant colors in the sponge?
Use gel food coloring gels to tint each sponge batter. These provide rich hues without affecting batter consistency.
- → What is the best way to slice the sponges evenly?
Trim the edges for uniformity, then cut into small, consistent squares (about 3 x 3 cm) for easy assembly.
- → How should the layers be assembled?
Arrange colored sponge squares side-by-side, use a thin layer of buttercream between them to adhere the pieces, building up layers with alternating colors for a patchwork effect.
- → Can I prepare the cake in advance?
Yes, the sponges can be baked ahead. Once assembled and frosted, chill the cake for at least 30 minutes before slicing.
- → What alternatives exist for dietary restrictions?
A gluten-free flour blend can substitute all-purpose flour to accommodate gluten intolerance while maintaining texture.