 Save
Save I'll never forget the Christmas Eve my grandmother pulled out her massive wooden board and said, "This year, we're making the trees speak." She meant the Tannenbaum Border—those elegant little cheese triangles that line the edge of a holiday platter like a protective forest of evergreens. I was maybe twelve, standing on a stool to see over the counter, watching her slice cheese with the precision of someone who understood that presentation is its own kind of love language. Now, every time I arrange these little trees, I'm transported back to that kitchen, the smell of pine and aged Gouda filling the air, my grandmother's hands guiding mine to make the points sharp and proud.
I served this border for the first time at a casual holiday gathering, thinking it was too simple, too playful for adults. Then I watched a friend stop mid-conversation, point at the board, and smile—really smile—like she'd just been transported somewhere magical. That's when I realized the Tannenbaum Border isn't about impressing people with complexity; it's about giving them permission to feel joy in small, beautiful things. The cheese trees became a tiny gift, a moment of delight on an ordinary Thursday in December.
Ingredients
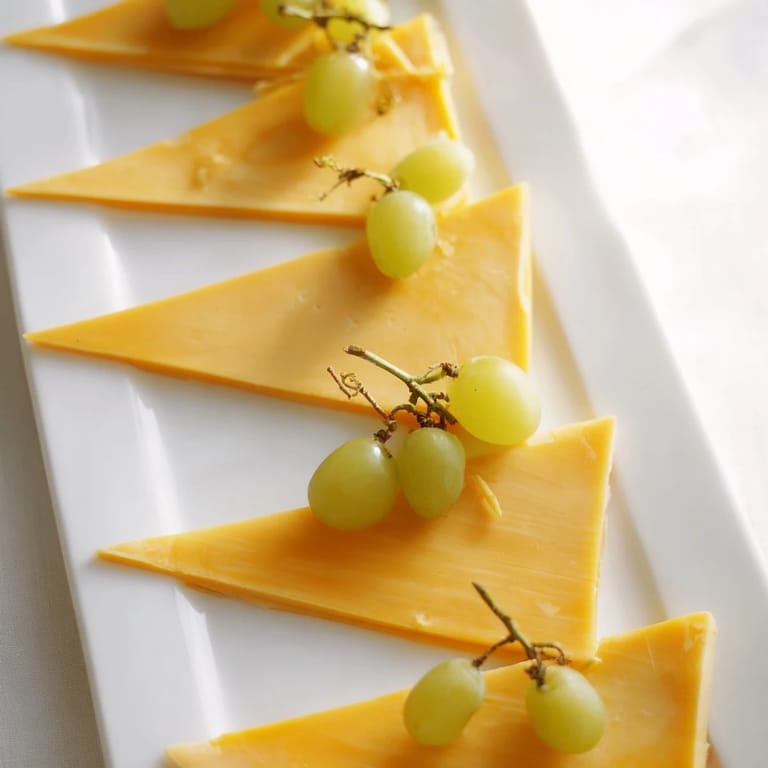
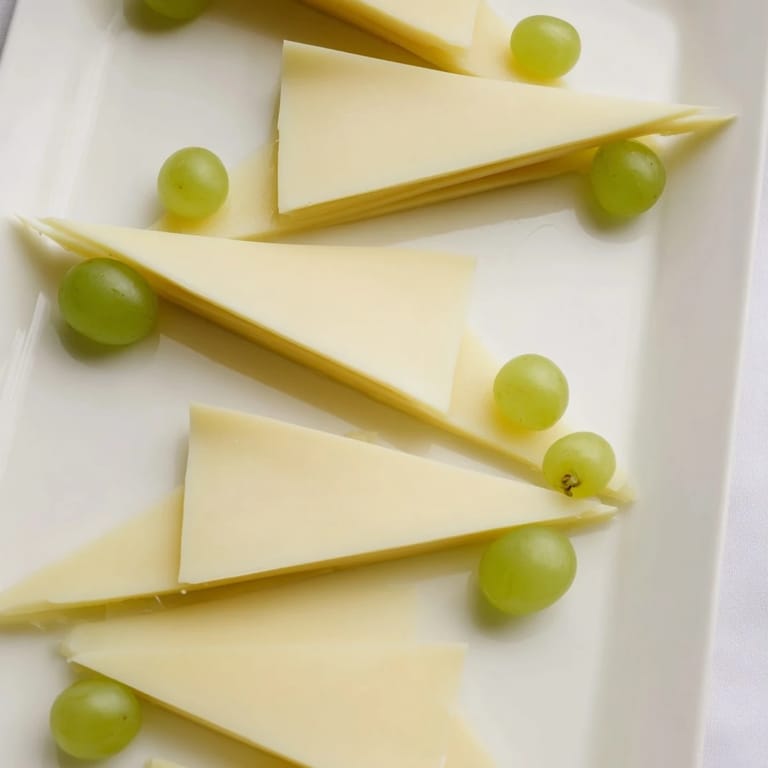
- Semi-firm cheese (Gouda, Edam, or Emmental), 250 g, well chilled: The structure of these cheeses is your best friend here—they're firm enough to hold a sharp point when sliced, but not so hard that they shatter. I learned the hard way that room-temperature cheese becomes a mushy disappointment; chilling it for at least an hour before slicing makes all the difference. Gouda has that creamy sweetness that feels celebratory, while Emmental brings a nuttier sophistication.
- Small green seedless grapes, 150 g, washed and thoroughly dried: These are your understory, the forest floor beneath your trees. The drying part is crucial—wet grapes slide around and won't nestle properly between the cheese triangles. Pat them dry with a clean kitchen towel and let them sit uncovered for a few minutes before arranging.
Tired of Takeout? 🥡
Get 10 meals you can make faster than delivery arrives. Seriously.
One email. No spam. Unsubscribe anytime.
Instructions
- Chill your cheese:
- Pull your semi-firm cheese from the refrigerator and let it sit for 15 minutes. You want it cold enough to hold its shape but not so frozen that it cracks when you slice. Run your knife under hot water and dry it between each slice—this sounds fussy, but a warm blade glides through cold cheese like it's meant to.
- Slice your trees:
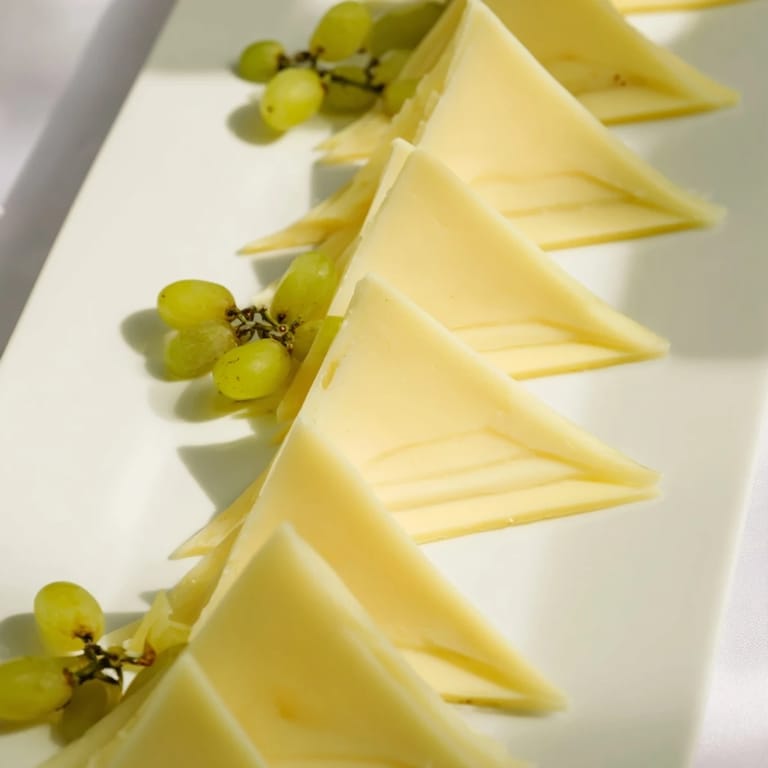
- Using a sharp chef's knife and a steady hand, cut the cheese into thin triangles approximately 5–6 cm long and 1 cm wide at the base. Think pine tree silhouette—narrow at the top, broader at the bottom. This part is where the magic happens, and honestly, imperfect trees look more charming than perfect ones. I aim for consistency rather than perfection.
- Arrange the border:
- Start at one corner of your board and lay the cheese triangles along the edge, points facing outward like little evergreens standing at attention. You'll naturally find a rhythm—down one side, around the corner, along the next. It's meditative work, the kind that feels good in your hands.
- Nestle the grapes:
- Now comes the part that feels like you're building a tiny landscape. Tuck the dried grapes into the spaces between the cheese triangles and around the edges. They're the subtle green that makes the whole arrangement feel alive and intentional. Fill the gaps, but don't overcrowd—leave some cheese visible so the triangles remain the stars.
- Complete your forest:
- Continue until the entire border is wrapped around your board, creating an unbroken line of trees. Step back and look at it. Does it make you happy? Good. That's the sign you've got it right.
 Save
Save My favorite memory of this border isn't from a formal gathering at all—it's from an ordinary Tuesday in January when I made it just for my family of four. My daughter, who was seven at the time, pointed at it and said, "Mom, did we go to the forest?" In that moment, I understood that this little arrangement had done exactly what food is supposed to do: it made someone see something beautiful and feel something warm.
Styling Your Board Like a Pro
Once your Tannenbaum Border is complete, the real fun begins. The border acts as a frame, and everything inside is your canvas. I like to fill the center with a mix of cheeses in different shades and textures—a crumbly aged cheddar, a creamy brie, maybe a sharp blue cheese if your crowd is adventurous. Add cured meats, crackers that complement rather than compete, and small bowls of nuts, preserves, or honeycomb. The key is balance: dark against light, hard against soft, salty against sweet. Let the cheese trees do the heavy lifting on presentation, and keep the center simple and inviting.
A Holiday Moment on Any Day
Here's something I've discovered over the years: this board doesn't have to wait for December. I've made it in February when winter needed lifting, in September at a casual dinner party, even in June just because someone needed a reason to slow down. The Tannenbaum Border has become my go-to whenever I want to give people something that says, "You matter enough for me to arrange cheese into little trees." It's a small gesture with big warmth behind it, and there's something profoundly generous about that.
Small Details That Matter Most
The beauty of this border is that it lives in the details—the way the light catches the facets of a freshly sliced triangle, how a single grape nestle into the space between trees feels like it was always meant to go there, the way your hands know what to do once you've made the first few cuts. This is food that rewards attention without demanding perfection. You can absolutely decorate with fresh rosemary sprigs tucked into the arrangement for an extra forest effect, or alternate in a few pomegranate seeds or red grapes for color contrast. Some people serve this with holiday-themed crackers or artisan breads, but honestly, it's beautiful enough to stand alone as conversation and art.
- Your knife is your most important tool—invest in sharpening it before you start, and your entire experience improves
- Make this arrangement up to 4 hours ahead, cover loosely with plastic wrap, and refrigerate; the cold keeps everything looking crisp and fresh
- The arrangement is forgiving—if a tree tips or a grape rolls away, simply adjust it. This is home cooking, not surgery
 Save
Save The Tannenbaum Border is proof that sometimes the most meaningful meals come from simple gestures and careful attention. Slice your cheese, arrange your trees, and watch people's faces light up.
Kitchen Guide
- → What type of cheese works best for the border?
Semi-firm cheeses like Gouda, Edam, or Emmental are ideal as they slice cleanly into thin triangles that hold their shape.
- → How should the cheese be cut to resemble pine trees?
Slice the cheese into thin, triangular pieces about 5–6 cm long and 1 cm wide at the base to mimic stylized pine tree shapes.
- → Can other fruits be used instead of green grapes?
Yes, alternatives like red grapes or pomegranate seeds can add color and visual interest to the border.
- → How do I assemble the border on the board?
Arrange the cheese triangles with points facing outward along the edges of the board, then nestle grapes between and around them to create a tree-like effect.
- → Are there any suggestions for enhancing the presentation?
Adding fresh rosemary sprigs among the cheese and grapes can enhance the pine needle look and add a fragrant touch.